Here are some guidelines as to create your own “Virtual printer” that has the capability to print a document from any windows application, say any browser, MS Office App, etc, into a format of our requirement. This solution makes use of an open source DLL provided by Ghostscript by the virtue of which one can convert a postscript file into formats like PDF, PNG, TIFF,BMP, etc,. I used C# to get this done.
We can make use of DLLs provided by Ghostscript and mfilemon. The Ghostscript provides means of converting the print and also the postscript printer installation file (INF, PPD, etc,.), meanwhile mfilemon supports us to add a new port of its kind by the virtue of which we can redirect the output of a postscript printer to a folder and then start an application that can convert this PS file to output format.
The following are the utilities that I used to create my own virtual printer.
- Ghostscript printer installation INF file (comes with Ghostscript download) :These files help us install a printer that prints the postscript of the doc to be printed.
- Ghostscript DLL (comes with Ghostscript download) :This DLL has functions in it to convert a postscript file into different formats.
- Mfilemon : A custom port with the source code available for free. The function of this port is to redirect the output of a printer to a folder and after the output of the printer is received an executable can be invoked. The output folder and the executable can be specified in the UI provided with the monitor or through code.
Steps Involved:
Before going into the steps we need the Ghostscript and the mfilemon downloaded.
The following are the steps involved in the setting up of a Virtual Printer:
I. We need to create an application that converts the postscript generated into various formats. To accomplish this task I made use of the DLL provided by Ghostscript (gsdll32.dll).
[Working of Ghostscript: once we have the Ghostscript installed we get an interface wherein we can give commands to convert a file format to another.
E.g.: The following command converts a PS file to PDF file
gs -dBATCH -dNOPAUSE -sDEVICE=pdfwrite sPAPERSIZE=a4 -sProcessColorModel=DeviceGray
–sOutputFilePDFFile.pdf PSFilename.ps
We can simulate this by importing the Ghostscript DLL and using the functions in it as described in the following section]
We first need to copy the DLL gsdll32.dll that comes with the Ghostscript download into the bin folder or the folder where this exe will reside. Then we can add a class that imports the DLL into the project and wraps the DLL so that it can be used with the native C# code as following:
using System;
using System.Collections.Generic;
using System.Linq;
using System.Text;
using System.Runtime.InteropServices;
using System.Collections;
using System.Runtime.InteropServices;
namespace PDFPrinter
{
    public class WGhostScript
    {
        // Import GS Dll
        [DllImport("gsdll32.dll")]
        private static extern int gsapi_new_instance(out IntPtr pinstance, IntPtr caller_handle);
        [DllImport("gsdll32.dll")]
        private static extern int gsapi_init_with_args(IntPtr instance, int argc, IntPtr argv);
        [DllImport("gsdll32.dll")]
        private static extern int gsapi_exit(IntPtr instance);
        [DllImport("gsdll32.dll")]
        private static extern void gsapi_delete_instance(IntPtr instance);
        // Set variables to be used in the class
        private ArrayList _gsParams = new ArrayList();
        private IntPtr _gsInstancePtr;
        private GCHandle[] _gsArgStrHandles = null;
        private IntPtr[] _gsArgPtrs = null;
        private GCHandle _gsArgPtrsHandle;
        public WGhostScript() { }
        public WGhostScript(string[] Params)
        {
            _gsParams.AddRange(Params);
            Execute();
        }
        public string[] Params
        {
            get { return (string[])_gsParams.ToArray(typeof(string)); }
        }
        public void AddParam(string Param) { _gsParams.Add(Param); }
        public void RemoveParamAtIndex(int Index) { _gsParams.RemoveAt(Index); }
        public void RemoveParam(string Param) { _gsParams.Remove(Param); }
        public void Execute()
        {
            // Create GS Instance (GS-API)
            gsapi_new_instance(out _gsInstancePtr, IntPtr.Zero);
            // Build Argument Arrays
            _gsArgStrHandles = new GCHandle[_gsParams.Count];
            _gsArgPtrs = new IntPtr[_gsParams.Count];
            // Populate Argument Arrays
            for (int i = 0; i < _gsParams.Count; i++)
            {
                _gsArgStrHandles[i] = GCHandle.Alloc(System.Text.ASCIIEncoding.ASCII.GetBytes(_gsParams[i].ToString()), GCHandleType.Pinned);
                _gsArgPtrs[i] = _gsArgStrHandles[i].AddrOfPinnedObject();
            }
            // Allocate memory that is protected from Garbage Collection
            _gsArgPtrsHandle = GCHandle.Alloc(_gsArgPtrs, GCHandleType.Pinned);
            // Init args with GS instance (GS-API)
            gsapi_init_with_args(_gsInstancePtr, _gsArgStrHandles.Length, _gsArgPtrsHandle.AddrOfPinnedObject());
            // Free unmanaged memory
            for (int i = 0; i < _gsArgStrHandles.Length; i++)
                _gsArgStrHandles[i].Free();
            _gsArgPtrsHandle.Free();
            // Exit the api (GS-API)
            gsapi_exit(_gsInstancePtr);
            // Delete GS Instance (GS-API)
            gsapi_delete_instance(_gsInstancePtr);
        }
    }
}
Now this class can be used to do the conversions. The previous example that shows how a PS file can be converted to PDF can be achieved by the following C# code:
[*previous example
gs -dBATCH -dNOPAUSE -sDEVICE=pdfwrite sPAPERSIZE=a4 -sProcessColorModel=DeviceGray
–sOutputFilePDFFile.pdf PSFilename.ps
]
Corresponding code in C#:
PDFPrinter.WGhostScript gs = new PDFPrinter.WGhostScript();
gs.AddParam("-dBATCH");
gs.AddParam("-dNOPAUSE");
gs.AddParam("-sDEVICE=pdfwrite");
gs.AddParam("-sPAPERSIZE=a4");
gs.AddParam("-sProcessColorModel=DeviceGray");
gs.AddParam("-sPDFPassword=password");
gs.AddParam(@"-sOutputFile=" + outfile);
gs.AddParam(psFilePath);
gs.Execute();
*outfile: the full file name of the output file. According to the configuration we made we can use the path C:tempPDFOutFile.pdf
*psFilePath: the location of the postscript file created by the printer, as per the configuration we made it is C:tempFile.ps
II. The next step is to create a port type of our need. We make use of the mfilemon which is available over the net and is open source. The “mfilemon” provides two DLLs namely mfilemon.dll & mfilemonUI.dll. These DLLs needs to be copied to the System32 folder. Once we have these DLLs copied to the folder we need to run an exe that comes up with the “mfilemon” called “regmon.exe” with an argument ‘-r’. This can be done programmatically as following:
*Specify the location of the DLLs and the EXE where necessary instead of the “Application.StartupPath”
string sourceFile = System.IO.Path.Combine(Application.StartupPath, "mfilemon.dll");
string destFile = System.IO.Path.Combine(Environment.SystemDirectory, "mfilemon.dll");
System.IO.File.Copy(sourceFile, destFile, true);
sourceFile = System.IO.Path.Combine(Application.StartupPath, "mfilemonUI.dll");
destFile = System.IO.Path.Combine(Environment.SystemDirectory, "mfilemonUI.dll");
System.IO.File.Copy(sourceFile, destFile, true);
Process regmon = new Process();
string filename = Path.Combine(Application.StartupPath, "regmon.exe");
regmon = Process.Start(filename, "-r");
regmon.WaitForExit();
regmon.Close();
This adds in a new port type to the machine.
III. Now we need to add a new port into the list of ports. This can be added programmatically as following:
a. Windows use some DRVs that are already present in the machine to add and remove ports. We can use these DRVs to add our port through code by importing them.
b. Once we have the DRVs imported then we can use it to add the port of type MultiFilePort Monitor that we just registered in the previous step. To create a new port we can write in a function as following that takes the desired name of the port that we are intending to create. The printer will be installed to this port.
[*This can be called as AddPort(“MFPDEMO1:”), where “MFPDEMO1:” is the name that we give in to the new port.]
// Importing the winspool.drv
[DllImport("winspool.drv", EntryPoint = "XcvDataW", SetLastError = true)]
        private static extern bool XcvData(
            IntPtr hXcv,
            [MarshalAs(UnmanagedType.LPWStr)] string pszDataName,
            IntPtr pInputData,
            uint cbInputData,
            IntPtr pOutputData,
            uint cbOutputData,
            out uint pcbOutputNeeded,
            out uint pwdStatus);
        [DllImport("winspool.drv", EntryPoint = "OpenPrinterA", SetLastError = true)]
        private static extern int OpenPrinter(
            string pPrinterName,
            ref IntPtr phPrinter,
            PRINTER_DEFAULTS pDefault);
        [DllImport("winspool.drv", EntryPoint = "ClosePrinter")]
        private static extern int ClosePrinter(IntPtr hPrinter);
// Function that’s adds the new port (specify port-name as parameter)
public static int AddPort(string portName)
{
  PRINTER_DEFAULTS def = new PRINTER_DEFAULTS();
  def.pDatatype = null;
  def.pDevMode = IntPtr.Zero;
  def.DesiredAccess = 1; //Server Access Administer
  IntPtr hPrinter = IntPtr.Zero;
  int n = OpenPrinter(",XcvMonitor Multi File Port Monitor", ref hPrinter, def);
  if (n == 0)
   return Marshal.GetLastWin32Error();
  if (!portName.EndsWith("�"))
   portName += "�"; // Must be a null terminated string
  // Must get the size in bytes. Rememeber .NET strings are formed by 2-byte characters
  uint size = (uint)(portName.Length * 2);
  // Alloc memory in HGlobal to set the portName
  IntPtr portPtr = Marshal.AllocHGlobal((int)size);
  Marshal.Copy(portName.ToCharArray(), 0, portPtr, portName.Length);
  uint needed; // Not that needed in fact...
  uint xcvResult; // Will receive de result here
  XcvData(hPrinter, "AddPort", portPtr, size, IntPtr.Zero, 0, out needed, out xcvResult);
  ClosePrinter(hPrinter);
  Marshal.FreeHGlobal(portPtr);
  return (int)xcvResult;
}
IV. Now once we have this new port to which we can add in a printer we need to configure the settings of the port to that it will redirect the result of a postscript printer to the specified folder and then invoke an exe that will convert the postscript to various formats. This is done as following:
a. We create a subkey in the registry corresponding to the new port created in C#:
b. Then we add in the configuration values into the subkey created:
i. Select the newly added subkey:
ii. Set the configuration
a.
//Create a Subkey in REGISTRYm for the new port added
Registry.LocalMachine.CreateSubKey("SYSTEMControlSet001ControlPrintMonitors
Multi File Port MonitorMFPDEMO1:");
b.i.
bool found = false;
string portName = "MFPDEMO1:";
//Open the subkey newly created
RegistryKey PrinterPort = Registry.LocalMachine.OpenSubKey("SYSTEMControlSet001ControlPrintMonitorsMulti File Port Monitor", true);
foreach (string pp in PrinterPort.GetSubKeyNames())
 {
  if (pp == portName)
  {
   PrinterPort =                         Registry.LocalMachine.OpenSubKey("SYSTEMControlSet001ControlPrintMonitorsMulti File Port Monitor" + "" + portName, true);
   found = true; break;
  }
 }
b.ii.
if (found)
 {
  /*Multi file port settings*/
  PrinterPort.SetValue(@"ExecPath", @"C:temp");
  PrinterPort.SetValue(@"FilePattern", @"File.ps");
  PrinterPort.SetValue(@"OutputPath", @"C:temp");
  PrinterPort.SetValue(@"Overwrite", 0x1);
  PrinterPort.SetValue(@"PipeData", 0x0);
  PrinterPort.SetValue(@"UserCommand", Application.StartupPath + @"PDFPrinter.exe");
  PrinterPort.SetValue(@"WaitTermination", 0x0);
 }
PrinterPort.Close();
* ExecPath: Execution path
* FilePattern: The output file name can be specified here.
* OutputPath: Location where the postscript is saved
* Overwrite: When the printer prints the next postscript of the print job the PS file is over written.
* PipeData: Not required hence 0
* UserCommand: The path of the exe that will convert the PS file to required format.[The creation of this exe is discussed in step I ]
* WaitTermination: Wait till termination, not required hence 0.
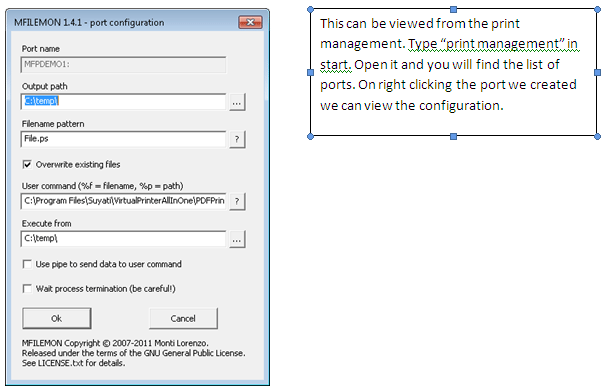
These settings can be viewed once the above code is executed and the machine restarted as following:
V. Now we have the printer configured and a new postscript printer can be added to this port. I have used a post script printer that comes with Ghostscript download. The installation was managed by executing a batch file that had the command to install a printer given its INF file as following:
rundll32 printui.dll,PrintUIEntry /if /b "VIRTUALPRINTER" /f ghostpdf.inf /r "MFPDEMO1:" /m "Ghostscript PDF"
*MFPDEMO1: Port created earlier
*VIRTUALPRINTER: /b stands for name of the printer
* ghostpdf.inf: The location of INF file, I placed the INF in the same folder where the batch was executed; hence I had to specify the filename alone and not the full path.
The following files are to be present in the installation folder [comes with Ghostscript download]:
• ghostpdf.inf
• ghostpdf.PNF
• GHOSTPDF.PPD
Up till now we have the printer configured.
And thus we have the virtual printer. For the port configuration to be applied the machine needs to be restarted.
VI. Workflow:
Once we have the printer installed into the machine, the workflow will be as following:
When the user gives in a Ctrl + P command to print he/she will get a UI where they can select the printer to which they want to submit the job to. In the screen shot below the Virtual Printer has been selected:

Once we select the printer, and press the OK button, the printer prints the PS file to the folder specified in the ports configuration. When the printing is done the exe specified in the configuration is invoked. Here the exe is the Virtual Printer that we had created in the first step which will convert the PS file to any format. I created a UI as shown in the figure below into the Virtual Printer exe where you can see the formats to which the printer can write files to.


5 comments
Is this project available for download?
Hi Eric Watkins,
I am sorry but I don’t have the project in downloadable form. But all the DLLs that I’ve stated for development of the same are available to download from corresponding sites.
Good afternoon, I followed the steps mfilemon however when I run the application exe returns a Windows message about interactive processes, could help me? Sorry my English, I speak of Brazil. Thank you!
Hi Filipe Santos,
Can you provide more details on the windows message you are getting?
Thank you
Hi
I could not invoke the application(exe) which configured in the UserCommand .
Hope your support
Sreejith