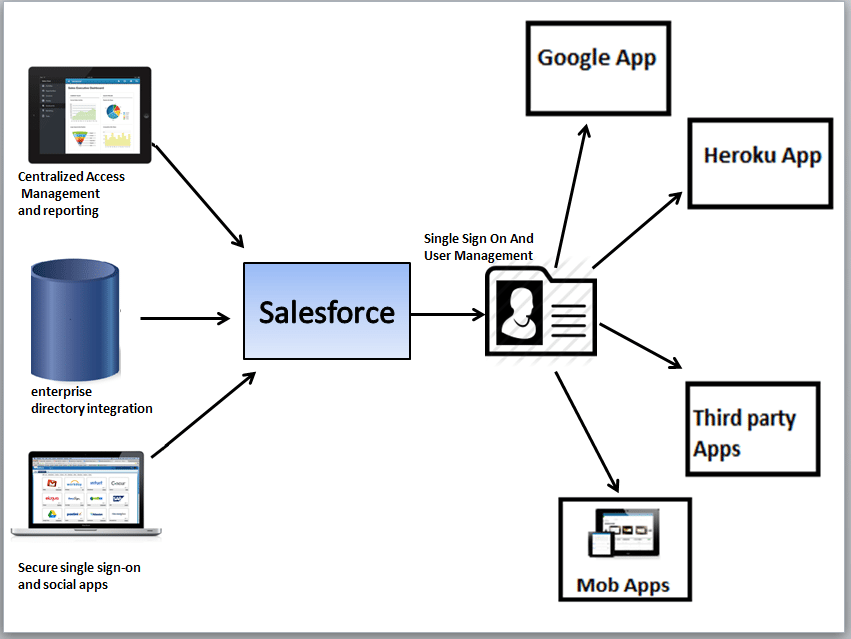
Salesforce Identity connects one Salesforce user with other Salesforce organizations or third party applications. Using Salesforce Identity, it is possible to single sign-on (SSO) for employees to sign in to multiple applications. By implementing SI user can login to Salesforce and can jump in to their different applications without wasting time to sign in each. Also the organization can enhance the security of their data by creating its own domain name. Instead of the Salesforce login page it is possible to customize the login page of the organization.
Salesforce Identity Implementation
My domain; Customize the login page
Unless login from the sales force login page (www.salesforce.com), users can login to the Salesforce application from customized login page using customized URL. Implementing own URL can done using the following steps:
- In Setup Area, Domain Management- > My Domain
- Enter your domain name
- The login URL would be “https:// domain name.my.salesforce.com
- Check the Availability.
- Select the checkbox for Terms and Conditions
- Register Domain.
- You’ll receive an email when your domain name is ready for testing
- Test domain
- Click Deploy to Users
From Domain management we can also edit the login page UI. User can upload organization logo that to be appear on the login page instead of the Salesforce logo. The back ground color can change from blue to any other color.
App Launcher
The App Launcher presents users already logined in Salesforce with logos that link to all of the Apps from a unified user interface. An approximate Launcher Tab look likes below
To see the App Launcher, users need to have “Use Identity Features” should enabled, and the App Launcher set to Visible. The apps shown in a user’s App Launcher Enable the App Launcher with a permission set are authorized based on profiles or permission sets. Users see only the apps they can access and have single sign-on authorization into those apps.
Set up Single Sign-on
Securing the connection
There are two Authorization standards for implementing SSO in Salesforce; SAML and OAuth.
- SAML
Security Assertion Markup Language is an XML-based standard that allows you to communicate authentication decisions between one service and another. In Salesforce We use SAML to implement Single Sign-On into Salesforce from an Identity provider. - OAuth
OAuth is an open protocol used for single sign-on to allow secure authorization between applications. OAuth “flows” describe different ways of implementing OAuth for Salesforce orgs.
Salesforce Identity Provider Certificate
- From Setup, click Security Controls > Identity Provider. You get the certificate for signing SAML assertions in the Identity Provider Setup section. Optionally, you can change the self-signed certificate to a production certificate issued by a signing authority. For more information about certificates, see “Creating Certificates and Key Pairs” in the online help.
- Click Download Certificate. The certificate validates signatures, and you need to upload it to your Google Administrator account.
Set up Single Sign-on to Google Apps
Set Google Administrator Single Sign-On Options
In your Google Administrator account, set the values for single sign-on. You need to sign in as an Administrator to the Google Apps account at https://admin.google.com.
- In your Google Administrator account, More Controls -> Security -> Advanced Settings- > Set up single sign-on
- Enter the following values.
- Sign-in page URL: https://domainname.my.salesforce.com/idp/endpoint/HttpRedirect Replace domainname with your custom domain name.
- Sign-out page URL: https:// domainname.my.salesforce.com/….
- Replace domainname with your custom domain name.
- Change password URL: https:// domainname.my.salesforce.com/UI/system/security/ChangePassword
- Replace domainname with your custom domain name.
- Upload the identity provider certificate file you saved in Get a Salesforce Identity Provider Certificate as Verification certificate.
- Select Use a domain specific issuer.
- Set up Single Sign-on to Google Apps Get a Salesforce Identity Provider Certificate
- Save
Create a Connected App for Gmail
For example We can look how we can connect Gmail with our Salesforce App .
Follow these steps in your Salesforce organization.
- In Setup area Create- > Apps
- New
- Enter the following values
- Connected App Name: GMail.
- Contact Email: your administrator Email address.
- Logo Image URL: Select choose one of our sample logos, find the logo you want, and click on it. Then, copy the Logo URL. Paste the value back in the Logo Image URL field. Or, enter your own URL.
- In the Web App Settings section, enter the following values
- Start URL: https://gmail.google.com
- Select Enable SAML
- Entity Id: Enter google.com/a/yourGoogleAppDomainName. Replace yourGoogleAppDomainName with your actual Google domain name
- ACS URL: The same as Entity Id with the “https” prefix and the “acs” suffix, such as https://google.com/a/yourGoogleAppDomainName/acs
- Subject Type: Select how the user is identified. This field should contain the Google Apps Email address for the user
- Save
- In setup area Manage Apps -> Connected Apps
- Click on the name of the connected app, which is “GMail” in this case. Copy the IdP-Initiated Login URL value and Edit
- In the Start URL field, Copy &paste the following string the value from the IdP-Initiated Login URL field, and add the following: The value copied from IdP-Initiated Login URL field + &RelayState=http%3A%2F%2Fmail.google.com%2Fa%2FyourGoogleAppDomainName Replace yourGoogleAppDomainName with your actual Google domain. You should have a value similar to this one: https://domainname.my.salesforce.com/idp/login?app=0sp600000000000k&RelayState=http%3B%2G%2Fmail.google.com%2Ka%2domainname.com
- Click Save
Now you can add this connected app to a profile or permission set. When that profile or permission set is applied to a user, the user will be able to use the GMail connected app. You can follow the same basic process to install any other Google Apps.
Two-Factor Authentication
Administrator can assure more secured login by selecting “Two-Factor Authentication for User Interface Logins” permission in the user profile or permission set. If this is done the users need to enter a time-based token generated from an authenticator app on their mobile device when they log into Salesforce. Along with the user name and password the time-based tokens ensure the secured login and each time it will help to authenticate the user.
Adding a Time-Based Token
You can add a time-based token to your account to use a mobile authenticator app to activate your computer. Once you add a time-based token to your account, you’ll be prompted to enter the changing token stored in the mobile app whenever Salesforce needs to confirm your identity, such as when you log in from an unknown IP address.
- Download the supported authenticator app for the type of mobile device you’re using.
- From your user detail page in Salesforce, click Add next to Time-Based Token.
- For security purposes, you’re prompted to log into your account.
- Scan the QR code with the authenticator app on your mobile device. Alternatively, you can manually enter your username and the key displayed when you click can’t scan the QR code? Into the app.
- Give the token generated from the mobile app into the Token field in Salesforce. The authenticator app generates a new token every 30 seconds.
- Verify and Add.
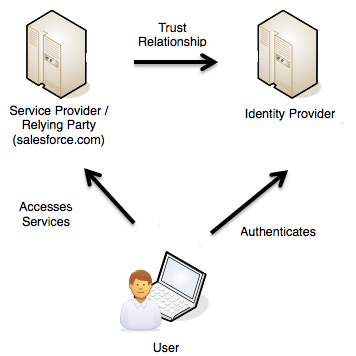
Identity Provider and Service Provider integration
An identity provider enables user to use single sign-on to access other websites. A service provider is a website that hosts applications. Using Salesforce Identity it’s possible to enable Salesforce as an identity provider, and can define one or more service providers, so your users can access other applications directly from Salesforce using single sign-on. This can be a great help to the users: instead of having to remember many credentials, they will only have to remember one. Also the applications can be added as tabs to the Salesforce organization, which means users won’t have to switch between programs. The authentication can be indicated as in the figure.
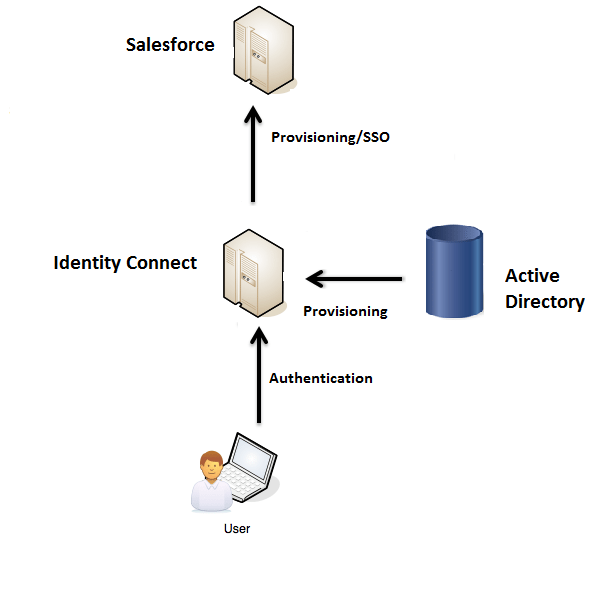
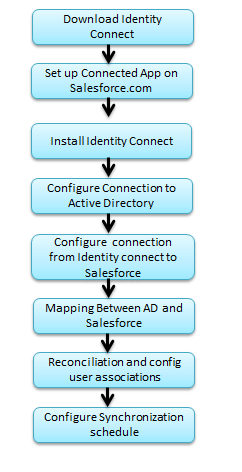
Salesforce Identity Connect
Identity Connect facilitates the Active Directory integration with Salesforce via a service which runs on either Linux or Windows platforms. This integration includes syncing Active Directory users with either Salesforce or Identity Connect acting as the Identity Service Provider (IDP) for Single Sign on (SSO) Active Directory integration when logging into Salesforce. The organization must have at least one Identity Connect license. From salesforce.com we need to obtain Identity Connect. The Identity Connect software will typically be installed on a server instead user to install Identity Connect individually.
Identity Connect includes a browser-based user interface, and is installed “on premises”, inside organization’s DMZ. A customizable UI wizard makes it possible to configure data synchronization from the Active Directory server to Salesforce. An Active Directory server can be connected to multiple Salesforce organizations. It will help to synchronize a sandbox organization and a production organization simultaneously. If the Identity Connect installed and configured, all the access to the subdomain of the organization on Salesforce can be configured to go through Identity Connect. Identity Connect manages user data across disparate data stores, users and passwords are not generally stored in IC itself. Administrative access to Identity Connect relies on the credentials of administration users in Active Directory
Identity connect implementation steps
Mapping Data between Active Directory and Salesforce
Identity Connect enables to specify how attributes and other data are mapped from the Active Directory data to the Salesforce data store.
- Attribute Mapping
It will map all the attributes of a user entry to a comparable attribute in Salesforce. A default set of mapped attributes is presented, with sample values for each attribute. - Profile to Group Mapping
It will map Salesforce profiles to Active Directory groups. A default profile mapping is required. If a user is not a member of any of the groups mapped in this section, he is mapped to the default Salesforce profile. - Permission Set to Group Mapping
It maps Salesforce permission sets to Active Directory groups. The permission sets displayed here are those that have been configured for your Salesforce organization
Data Synchronization & User Association Management
Identity Connect help to maintain the data consistency between the Active Directory and the Salesforce data store. This consistency is achieved by synchronization, which modifies user data on Salesforce to match the data in Active Directory. Before synchronization can occur, a reconciliation report is run. In Reconciliation two data sources are assess and analyze the consistency of the data across the two systems. The reconciliation process involves identification of the user accounts that exist in the two data stores, and assessment of their potential for matching.
Configuring the Synchronization Schedule
Data synchronization specify when and how often Active Directory data changes are pushed to the Salesforce data store. Data can be synchronized according to a defined schedule, or automatically, as soon as changes are made in Active Directory.
Monitor Applications and Run Reports
This is one of the biggest advantages of Salesforce Identity that the Connected app usage is stored in Salesforce can use for monitoring the usage of them. We can create and run reports on these app usages.
In the app usage records the following things includes:
- The number of users who have run the app.
- When they first used the app
- The most recent time they used the app
- The total number of times they used the app
Using this we can create a report which analyzing the app usage trends.